In case you prefer watching a video over reading the article: I gave a talk on this topic at UIKonf 2017. The organizers of the conference kindly made it available on YouTube:
Auto Layout is essential for creating modern, responsive user interfaces on iOS and macOS. Its core idea is easy to grasp – yet, it feels like a jungle full of hidden secrets to many. Once you dive a little deeper into the topic, you will discover that there is much more below the simple surface. The Auto Layout Comprehendium™️ is intended as a compendium for you to look up certain topics and to fully understand the internal mechanics behind the technology. While following an intuitive approach, it will help you master Auto Layout at a deeper level and empower you to build adaptable layouts without conflicts or ambiguities.
Fundamentals
- Layout and Drawing are two different things:
- Layout defines only the positions and sizes of all views on screen.
- Drawing specifies how each view is rendered (how it looks).
- Auto Layout is the preferred technology to define layouts for user interfaces on iOS and macOS.
- Its goal: To make it easy for you to create user interfaces that adapt automatically to different screen sizes and orientations.
- The position and size of a view relative to the origin of its superview are specified by the view’s frame:
- Position: (frame.origin.x, frame.origin.y)
- Size: (frame.size.width, frame.size.height)
- With Auto Layout enabled, you cannot set a view’s frame manually.
- More precisely: You still can set a view’s frame but doing so will have no effect. In the next layout pass, the frame you set will be overridden.
- You can “disable” Auto Layout and use manual frame positioning for a view instead if you set translatesAutoresizingMaskIntoConstraints = true.
- Note: This is a very simplified way of looking at this property but it’s a rule that’s easy to remember. And you should remember this because it’s a common mistake to forget about this property.
Constraints
Constraints are the core concept of Auto Layout. Instead of specifying the frames of each of your views manually:
myView.frame = .init(x: 10, y: 10, width: 120, height: 40)
you express the layout semantically with constraints. Semantically means that you just write down your real intent rather than hard-coded numbers.

If you have a layout with two buttons, for example, then your intent might be to place them next to each other and make them both have the same width. So you would specify:
leftButton.rightEdge = rightButton.leftEdge
leftButton.width = rightButton.width
Each of these two equations is called a constraint. Obviously, the two equations are not enough for defining an unambiguous layout. They still leave several degrees of freedom: For example, they do not specify the buttons’ heights, nor do they specify where the buttons are placed on screen.
Thus, you need to add more constraints: Each (non-redundant) constraint reduces the degrees of freedom of your layout (in other words: it constrains the possible layouts, thus the name “constraint”), until you end up with a well-defined, unambiguous layout.
If you add too many constraints though, they might also conflict with each other. So it’s a good practice to always try to describe your layout with as little constraints as possible.
Layout Anchors
In order to describe layouts expressively (as in the example above), we first need to define names for the “things” we want to constrain (for example a view’s left edge or its width). On iOS and macOS, the terminology we use is layout anchors. They describe either a particular position or a dimension of a view and can be grouped into three categories:
Base Layout Anchors
- Horizontal (x):
- leading
- trailing
- Vertical (y):
- top
- bottom
Deduced Layout Anchors
- Dimension:
- width = |trailing – leading|
- height = |bottom – top|
- Center:
- centerX = ½ (leading + trailing)
- centerY = ½ (top + bottom)
Text Layout Anchors
- Baseline (only for views that display text):
- firstBaseline
- lastBaseline
All these layout anchors (except the last two which only work for UILabels and UITextViews) are defined on every UIView instance so you can easily add constraints by setting one layout anchor in relation with another one, e.g.
okButton.top = titleLabel.bottom
for placing the okButton directly below the titleLabel.
Please note: All code shown above this line is pseudo code that is intended to help you understand the core concepts of Auto Layout. Please continue reading below or refer to the Apple documentation for the real syntax.
Layout Attributes & Layout Anchors: Don’t be confused when you come across the name “layout attribute”. Apple offers two different APIs to create constraints and depending on which you use you’ll either encounter the name “layout anchor” or “layout attribute”. Semantically they are the same.
The Constraint Equation
Generally, a constraint is a linear equation and can have a multiplier (other than 1) and an offset indicated by a constant.
anchor2 = multiplier × anchor1 + constant

That’s the general form of a constraint. You can add them to views visually in Xcode’s Interface Builder without even realizing you’re dealing with linear equations. You simply add tiny blue lines (⌥ + drag from one view to another) to connect layout anchors of different views with each other and specify the constants and multipliers by selecting them and entering the respective values in text fields in the attributes inspector.
That’s the way you should work with constraints because you will immediately see the effects of your constraints without rebuilding the app. I would even go as far as to claim that Auto Layout was designed to be implemented with Interface Builder. You get lots of other functionality for free like size classes (a feature to customize a layout for different screen sizes) and you should use it whenever you can.
However, it’s important to remember that every blue line in Interface Builder is only a visual representation of a linear constraint equation. It’s the only way to fully understand what’s happening during a layout pass and how the system transforms the constraints into the final coordinates to render the views on screen.
The Autoresizing Mask
Before the introduction of Auto Layout, it was difficult for developers to make layouts truly adaptive but there was already a useful tool for some basic “magical” auto-resizing: The Autoresizing Mask. That feature isn’t dead yet. In fact, Apple promoted the use of the autoresizing mask for simple layouts in one of their recent WWDC talks. So what is it all about?
As the name suggests, the autoresizing mask is a bitmask that consists of several flags to indicate if and how a view should resize when its superview resizes. There are six available options:
UIView
- Horizontal Margins:
- flexibleLeftMargin
- flexibleRightMargin
- Vertical Margins:
- flexibleTopMargin
- flexibleRightMargin
- Dimension:
- flexibleWidth
- flexibleHeight
When a view is not constrained externally (i.e. when there are no constraints between the view and the “outer world”), a visual representation of its autoresizing mask shows up in Size Inspector when the view is selected in Interface Builder:
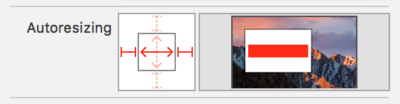
You enable or disable the above options by simply clicking the respective red lines. While hovering the configuration box an animation is shown on the right that indicates how the view will resize when its superview resizes with the current configuration.
The Autoresizing section disappears as soon as you start adding (external) constraints to the view.
The Concept: Springs and Struts
Disabling any of the flexible margin options is like pinning that edge of the view to the respective edge of its superview, possibly with some spacing (defined by the initial frame of the view). You can look at this as if there was a strut on that side of the view which can be disabled.
The flexible dimension options (flexibleWidth and flexibleHeight) act like springs when enabled: They make the view scale proportionally with its superview with respect to the particular dimension. If a button occupies 80% of its superview’s width and the superview’s width doubles at some point in time then the width of the button will also double.
In the screenshot above, the selected view has the following autoresizing mask:
myView.autoresizingMask = [.flexibleWidth,
                           .flexibleTopMargin,
                           .flexibleBottomMargin]
Note that while all options have the prefix “flexible”, only the inner options in the schematic in Size Inspector represent flexible springs. So while a strong red line inside the grey box indicates that the respective autoresizing option (flexibleWidth or flexibleHeight) is enabled, a strong red line outside the box indicates that the respective autoresizing option (flexible margin) is disabled. This can be quite confusing but once you get it, you won’t forget it (as with most “difficult” things 😉).
Deactivating Auto Layout
… is not possible on iOS. As Jesse Donaldson said in his WWDC talk “Mysteries of Auto Layout, Part 2”:
We just do everything with constraints.
You can however still set a frame manually and – as stated above – it’s also possible to work with a view’s autoresizing mask. There is one very important switch on each view that you need to enable first if you want to set its size and position the traditional way. It’s called:
translatesAutoresizingMaskIntoConstraints
The name of this property is very precise. Unfortunately, it’s too precise for developers who don’t know anything about the traditional stuff and so many people just don’t really have a clue what it does. Here’s the answer:
When you set this property to true the system will create internal constraints at runtime that mimic exactly the behavior of the view’s autoresizing mask. As all views are initiated with an inflexible autoresizing mask by default (i.e. enabled options: none) you may also look at this property as a switch to toggle between setting the view’s frame manually and using Auto Layout:

This is only correct if you do not modify the view’s default autoresizing mask. In my experience, most people don’t and thus the switch analogy is a valid way to look at it. The benefit is that it simplifies things a lot because you can now read this property like:
translatesAutoresizingMaskIntoConstraints ⇔ allowsSettingFrameManually
which is at least a little bit easier to read and much easier to understand.
Avoiding Conflicts
There are two important rules that you should keep in mind when working with Auto Layout:
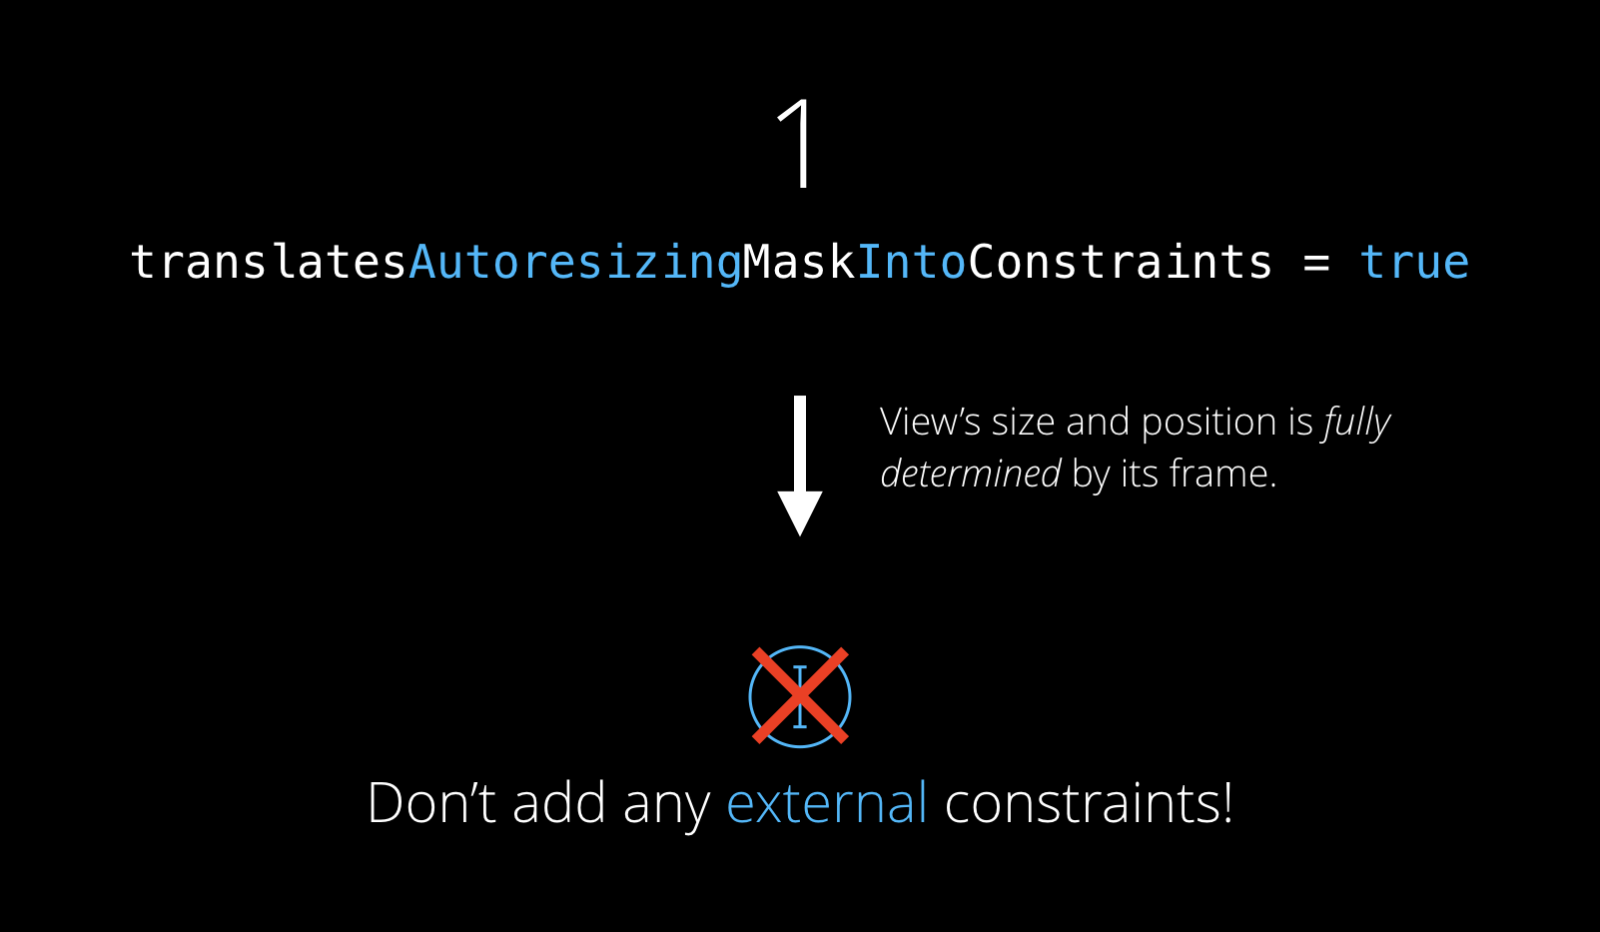
Don’t add any external constraints to a view when you set its translatesAutoresizingMaskIntoConstraints property to true! The view’s frame and its autoresizing mask already fully specify the view’s size and position. Any additional constraints you add will inevitably conflict with the internal constraints created by the system.
 For views you create in Interface Builder, translatesAutoresizingMaskIntoConstraints is set to false by default, for views you create in code, the property is set to true. Thus,
- if you want to manually position the a view that was created in Interface Builder, you first need to set translatesAutoresizingMaskIntoConstraints = true for that view
- if you want to use Auto Layout on a view for setting its size and position, you first need to set translatesAutoresizingMaskIntoConstraint = false for that view.
Layout Priorities
In order to allow for more sophisticated layouts each constraint has a priority. The priority is represented by an integer value within the range from 1 to 1000. The higher the priority, the more important the constraint.
When you create a new constraint (in Interface Builder or in code) it’s assigned a priority of 1000 by default. It’s said to be a required constraint which means that it must be satisfied when the constraints are resolved. If there are any conflicting constraints which are required as well, your layout will break.
In order to remain in control of what happens in case of a conflict, you can slightly decrease the priority of a constraint that is less important. The constraint is then said to be optional and will be represented by a dashed line in Interface Builder. The most common scenario to adjust constraint priorities is when dealing with inequality constraints.

Example:
You have a button that you want to be 300 pt wide. However, it’s utterly important for you that the button’s width never exceeds its superview’s width. So you create two constraints for it:
button.width = 300              // priority: 999
button.width <= superview.width // priority: 1000
The latter requirement is more important for you so you keep it as a required constraint (priority = 1000) but you reduce the priority of the first constraint in order to allow the layout engine to break this constraint in case the button’s superview is smaller than 300 pt.
Default Priorities
There are several default priorities defined as constants in UIKit:
UILayoutPriority.required    // 1000
UILayoutPriority.defaultHigh // 750
UILayoutPriority.defaultLow  // 250
As a rule of thumb, when changing the priority of a constraint you should always start from these default priorities and only slightly increase or decrease them as needed. If you’re wondering when you should use the defaultHigh and defaultLow priorities, please read the section “Content Hugging & Compression Resistance”. If you catch yourself assigning a priority of 678 to a constraint, for example, you should definitely reevaluate your layout logic.
The Intrinsic Content Size
If we were to be only using constraints to describe our layouts we would need to create at least 4 constraints for every view in the hierarchy. That’s a lot of overhead, especially as there are several system controls that should always have the same size, like a UISwitch for example.
This is where the intrinsic content size comes into play. It’s a view’s natural size, the size it prefers to assume. It’s a property on UIView that may be overridden in any subclass.
Example
Here are the intrinsic content sizes of some of the most common UIKit components:
 | UISwitch
|
 | UIActivityIndicator
|
 |
UIButton
|
 |
UIImageView
|
 |
UILabel
|
 | UIView
|
How it Works
There is nothing magic about the intrinsic content size. Well, almost. What’s important to know is that during each layout pass the system creates constraints for the intrinsic content size. These constraints are optional. Thus, they only apply when you do not add any constraints (with a higher priority) that will result in another size.
And that’s the power of the intrinsic content size: If you only constrain the position of a view but not its size it will automatically assume its intrinsic content size. If you constrain its size as well your constraint will prevail without causing a conflict.
Content Hugging & Compression Resistance
When I said that the system creates optional constraints for the intrinsic content size you probably thought of a simple constraint like this (we’re only looking at the horizontal dimension for now):

But it’s not that simple. If there was only a single constraint for the intrinsic content size that couldn’t be satisfied that constraint would simply be ignored and the view would have an undefined size.
That’s why in reality the intrinsic content size (for one dimension) is represented by two inequality constraints:

The first constraint (with the >= sign) is called compression resistance because it says that the view’s width should not be smaller than its intrinsic content width.
The second constraint (with the <= sign) is called content hugging because it says that the view’s width should not be greater than its intrinsic content width.
These names make sense because effectively, the first constraint is “pushing” the view’s bounds from the inside and thus counteracts any attempt to compress it whereas the second constraint is pulling the view’s bounds towards its center as if it were hugging its content.

In most cases it’s acceptable if a view is bigger than its intrinsic content size because all the information it shows is still visible. On the other hand it’s usually a bad thing if a view is smaller than its intrinsic content size because in that case some important information might be cut off.
For that reason the priority of the compression resistance constraint is greater than the priority of the content hugging constraint by default:
- Compression Resistance Default Priority = UILayoutPriority.defaultHigh (750)
- Content Hugging Default Priority = UILayoutPriority.defaultLow (250)
Interface Builder automatically adjusts these priorities if there are several labels constrained to each other in a line (e.g. in a stack view). This happens to avoid ambiguity.
As these content hugging & compression resistance constraints (also referred to as CHCR) are only created at runtime internally you cannot set their priorities directly. Instead, you can set them through UIView’s accessor methods
setContentHuggingPriority(_: UILayoutPriority, for: UILayoutConstraintAxis)
and
setContentCompressionResistancePriority(_: UILayoutPriority, for: UILayoutConstraintAxis)
or directly in Interface Builder’s Size Inspector:

Again, doing this in Interface Builder is much easier and I recommend you to do so.
The Layout Pass
Now that we have all the pieces together we have all we need to understand how the system actually computes the positions and sizes of all the views on screen from the constraints. It’s good to know how this works because it gives you more control over your layout and the ability to tweak the output of the layout engine.
layoutSubviews()
This is where the “magic” happens: layoutSubviews() looks at all the constraints that affect the size of any of the view’s subviews and transforms them into actual frames.

Now it’s important to remember that every constraint is only a representation of a simple linear equation. Thus, if we write down all the constraints that affect a view’s subviews we end up with a set of linear equations. What happens behind the scenes is that the system solves this set of linear equations for us. This is called a layout pass.
Example
Let’s assume that our user interface consists of a single button only that is constrained to have an 8 pt margin to the leading, trailing and top edge of the root view and a height of 20 pt. This results in four linear equations as shown in the image below.

The root view’s leading, trailing and top anchors are defined by the dimensions of the screen. Hence they are known at runtime. For an iPhone X with a resolution of 375 × 812 pt the root view’s base layout anchors are:
- rootView.leading = 0
- rootView.trailing = 375
- rootView.top = 0
- rootView.bottom = 812
For right-to-left languages you need to swap the values of leading and trailing.
The only unknown variables are the four layout anchors of the button:
- button.leading
- button.trailing
- button.top
- button.bottom
As width and height are deduced layout anchors they can always be expressed in terms of the base layout anchors. So instead of
button.height = 20
we write
button.top - button.bottom = 20
It’s necessary to perform this substitution because otherwise we might end up with six variables instead of four.
There is a rule in Linear Algebra that states:
A set of n linearly independent equations with n variables can always be solved and has a unique solution.
We got 4 equations and 4 variables which means that this rule applies and the set of constraint equations can be solved. From the four base layout anchors we can always deduce the frame:
- x = leading (trailing for right-to-left languages)
- y = top
- width = |trailing – leading|
- height = bottom – top
The Layout Algorithm
Because of the fact that constraints can have different priorities the layout engine cannot solve all linear equations at the same time. Effectively, it follows this algorithm:
- Start with the highest priority = 1000.
- Resolve all constraints with the same priority.
- Is the layout ambiguous?
-
- Yes:
- priority −= 1
- Go to step 2.
- No:
- Layout finished (return)
- Yes:
Understanding this algorithm means understanding how the priority works. Many developers think that a constraint with a priority < 1000 still has an effect on the layout even when the layout is non-ambiguous. This is not the case: As soon as the computed layout is non-ambiguous all constraints with a lower priority are simply ignored.
You should always first try to create a non-ambiguous layout with only required constraints and only reduce their priorities when you expect them to break under some circumstances.
It’s also important to know that if an optional constraint cannot be satisfied, the layout engine will try to come as close to the desired result as possible. This is an powerful leverage that you can use in conjunction with inequality constraints to achieve more sophisticated layouts.
Tweaking the Results of the Layout Engine
Most layouts can be implemented with Auto Layout and you should always try to do that. Even if the layout you have in mind is a little more complex there’s probably an Auto Layout solution to it.
However, some really fancy layouts might require some tweaking and if you need to do that the right place is inside layoutSubviews(), after calling the super implementation:
override func layoutSubviews() {
    super.layoutSubviews() // let the layout engine resolve your constraints
    // Now you can manually change the frames of any subview.
}
At this point you can safely assume that
- The frame of the view itself is set correctly.
- The frame of the view’s immediate subviews is set correctly.
So in case you need to perform any calculations based on the size of the view this is the place to do it.
How to Trigger a Layout Pass
If you set up all your layout in Interface Builder you don’t need to bother when exactly your view is being laid out. It all happens “automagically”. However, if you do need to set up parts (or all) of your layout in code it’s good to know when a layout pass is triggered.
The Principle of Invalidation
When you’re changing the layout of your view, you usually perform multiple steps to achieve the desired result. For example, you might
- deactivate a constraint
- add a new constraint
- add a new subview to the hierarchy
- constrain the subview within its superview
All these steps would require a recomputation of your layout even though you’re only interested in the final result. For that reason, UIKit does not immediately trigger a new layout pass when something within your changes because that would be inefficient. Instead, your layout is only invalidated. This happens whenever
- you add or remove constraints
- you modify existing constraints
- you add or remove a view from the view hierarchy

Invalidating the layout means that a boolean flag is raised (i.e. it’s set to true). Then, at a later point in time during the layout cycle the system checks if this flag is raised and only runs a layout pass if it is.

This flag is actually UIKit-internal so as a developer you don’t have direct access to it. This makes sense because you never need to pull it down yourself. It’s automatically set to false after a layout pass has finished.
The actual name of this property is slightly different but I’ll stick to the name needsLayout for better readability.
Invalidating the Layout Manually
Sometimes you change things in your view hierarchy that do not automatically invalidate the layout. If you change the text of a label, for example, you’ll probably want the label to resize the neighbouring views to adjust accordingly. In this case you need to take care of invalidating the layout yourself. As previously said, there is no way to access the needsLayout flag directly but you can always push it up by calling
setNeedsLayout()
This will mark your layout as invalid and thus your layout will be recomputed in the next layout cycle (i.e. layoutSubviews() will be called).
setNeedsLayout() does not trigger a layout pass immediately! It only invalidates the layout and “promises” that the layout will be recomputed in the next layout cycle.
Forcing an Immediate Layout Pass
Sometimes you don’t want to wait for the next layout cycle. This may due to some computations you need to perform that are based on the results of the layout engine or because you want to use the final frame of a subview for animating it.
In this case you can always manually trigger a layout cycle by calling
layoutIfNeeded()
Calling this method will result in the exact same behavior as if the system had triggered the layout cycle, i.e. the layout will only be recomputed if it has been invalidated before (either by the system or by calling setNeedsLayout()).
Thus, the combination of these two methods will always force an immediate layout pass:
setNeedsLayout()
layoutIfNeeded()
You should never call layoutSubviews() yourself. Instead, call layoutIfNeeded() if you need to force an immediate layout pass and invalidate the layout beforehand if necessary.
Updating Constraints
It’s a common misunderstanding among iOS developers that you need to call updateConstraints() or updateConstraintsIfNeeded() after you have added or modified any of your constraints. You don’t.
In fact, these methods give you the opportunity to add, remove or modify constraints as a batch. In 99% of the cases you don’t need to do that. Normally, you should update constraints directly after the change occurred. Apple’s documentation states:
If you want to change a constraint in response to a button tap,
make that change directly in the button’s action method.
The reason is that this makes the control flow a lot easier to understand and will result in cleaner code.
In some (rare) cases this might be too slow, for example when you need to
- change a huge number of constraints at the same time or
- redundantly switch the same constraints on and off multiple times in a row
If this is the case you should switch to a different paradigm and update all your constraints as a batch. To do this you need to override the updateConstraints() method and perform all changes to your constraints in there. This will yield better performance as the layout engine is more efficient when it’s being fed all changes at once.
